

How To Use Camera In Csp Animation
KeyFrames and Cameras in Prune Studio Pigment!
5,579 views
I RECOMMEND WATCHING THE VIDEO! I spent a long time on making information technology good! ☺☺
WHAT IS A KEYFRAME?
A keyframe is simply a indicate that you lot gear up.
You say hey, at first
-----------------------------------------------------------------------------------------------be over here
and so still many frames later, you say, hey
be right here.
And so Clip Studio Paint figures out all the inbetween points for you! And tin can motility, calibration, or rotate, unabridged blitheness layers, and cameras! (or even edit sound volume!)
Step 1 - ENABLE KEYFRAMES. Striking THIS Push
Have your animation folder selected, and hitting that button above! (Information technology's the second furthest 1 from the right on your timeline bar of buttons)
HOW Exercise You lot Add together A KEYFRAME?
Hit the button that says add keyframe. It will add together a keyframe onto whatever frame you have selected on your timeline!
Arrange FRAMES Calibration POSITION AND ROTATION BY USING THE OBJECT TOOL
Select the object tool, and and so y'all will see a bluish box that you tin can arrange! So you can change your animation layers position, scale, or rotation!
And don't worry nearly messing it up at all, because you're not ACTUALLY changing your original blitheness! I'll explicate.
ENABLE AND DISABLE KEYFRAMES - VERY Of import!!
Don't forget this.
When you have keyframes enabled, y'all tin NOT draw on your frames.
One time yous disable the keyframes, then your animation will be dorsum in the aforementioned spot with the same rotation and calibration it originally did when you drew it.
You tin describe on your drawings again when keyframes is disabled.
You lot can enable the keyframes anytime, and they volition still be there. They are not deleted.


IMAGE 1: Here I made a farmer squatting animation that was still and kinda boring.
IMAGE 2: With keyframes, I changed his rotation dorsum and along.
Epitome 3: And so with a CAMERA layer, I added zooming in and out!
HOW TO ADD CAMERA
To add together a camera, go to the peak menu.
Animation -> new animation layer -> second camera folder
IMPORTANT! - PUT Animation FOLDER Inside CAMERA Binder
You must put your animation folder into your photographic camera folder for the camera to have whatever affect on your animation!
HOW TO Add KEYFRAMES ONTO Camera
Keyframes on the photographic camera work the aforementioned way they did as before!!
Just press 'add keyframe push button' And employ Object Tool to manipulate the blue box on your canvas.
With the camera, the blue box represents what the camera is 'seeing'
Making the blue box smaller for example, makes the camera zoom in.
on my camera folder hither, I made the camera zoom in and out, by making the blue box smaller and bigger. Here was the result!

BONUS TIP - Brand EXTRA KEYFRAMES THAT CREATE SUBTLE Bounciness Issue

Here the camera zooms in on this daughter that I drew. A subtle but effective thing I did was calculation the last keyframe.
Here in this epitome, I drew blue boxes in a higher place the keyframes to show you approximately how big the cameras view box is.
With the first two keyframes, it zoom in fast, and then adjusts back out a little fleck due to that last keyframe! But it adds a lot.
Let'southward see what it looks like without that.

KEYFRAME INTERPOLATIONS
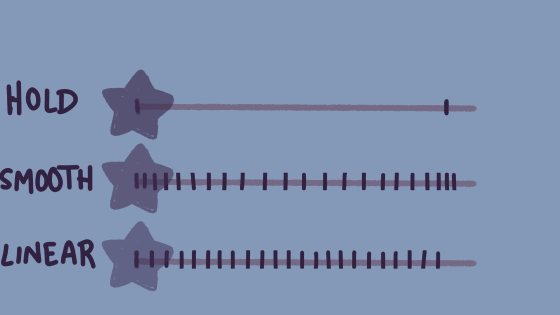
In that location are iii different interpolations with keyframes. This ways how the program is creating all the inbetween points.
Smooth is what y'all will utilise most of the time. It has a slower movement as it starts and ends.
Linear is actually good for robotic movement!
Hold is sometimes useful too!
THAT'Southward IT! Promise this was helpful!
Users who liked this post
Source: https://tips.clip-studio.com/en-us/articles/4266
Posted by: brownbefeepilf.blogspot.com
0 Response to "How To Use Camera In Csp Animation"
Post a Comment